
Banish Ping Spikes: How to Disable Wi-Fi Power Saving for Linux Gaming#
If you’re gaming on Linux over Wi-Fi, you might have run into a maddening problem: your connection is perfectly fine, but every few seconds or minutes, your ping randomly spikes to 300ms+, causing rubber-banding, missed shots, and general frustration.
Before you blame your router or your ISP, the culprit might be built right into your operating system. By default, many Linux distributions aggressively manage Wi-Fi power to save battery life. While this is great for watching YouTube at a coffee shop, it is an absolute nightmare for competitive gaming.
Here is exactly what is happening, and how to fix it in a few simple steps.
The Culprit: NetworkManager Power Saving#
To conserve energy, Linux’s NetworkManager will periodically put your Wi-Fi card into a low-power “sleep” state when it isn’t actively transmitting a large amount of data.
In a multiplayer game, your PC is sending and receiving a constant stream of very tiny packets. If your Wi-Fi card goes to sleep for even a fraction of a second between these packets, the data gets queued up. When the card wakes back up, it sends everything at once. To the game server, this looks like a massive ping spike.
To fix this, we need to tell NetworkManager to leave the Wi-Fi card running at full power all the time.
The Fix: Disabling Wi-Fi Power Management#
Most modern Linux desktop distributions (Ubuntu, Linux Mint, Pop!_OS, Fedora, Arch) use NetworkManager. You can disable Wi-Fi power saving by editing a single configuration file.
Step 1: Open your terminal
You will need root privileges to edit this file, so open up your preferred terminal emulator.
Step 2: Edit the NetworkManager configuration file
Use a text editor like nano to open the default Wi-Fi power save config. Run the following command: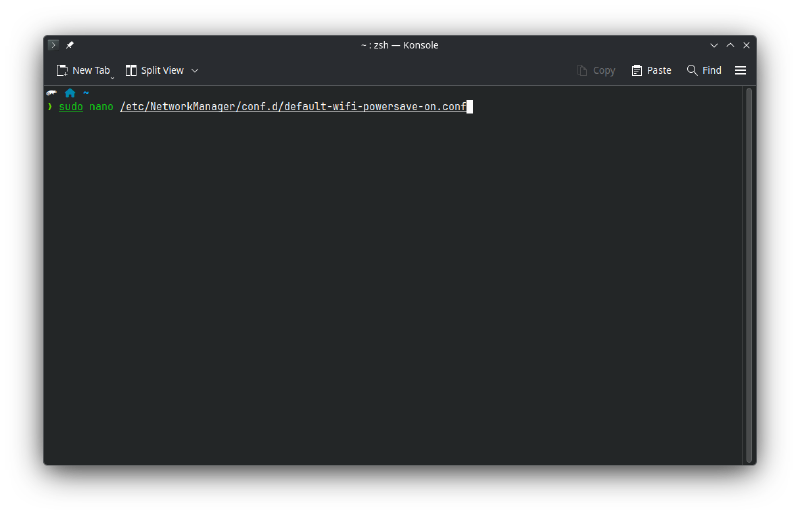
sudo nano /etc/NetworkManager/conf.d/default-wifi-powersave-on.conf(Note: Depending on your distro, this file might be located at /etc/NetworkManager/NetworkManager.conf. If the directory or file above doesn’t exist, create it or add the lines to the main conf file).
Step 3: Change the powersave value Inside the file, you should see something that looks like this:
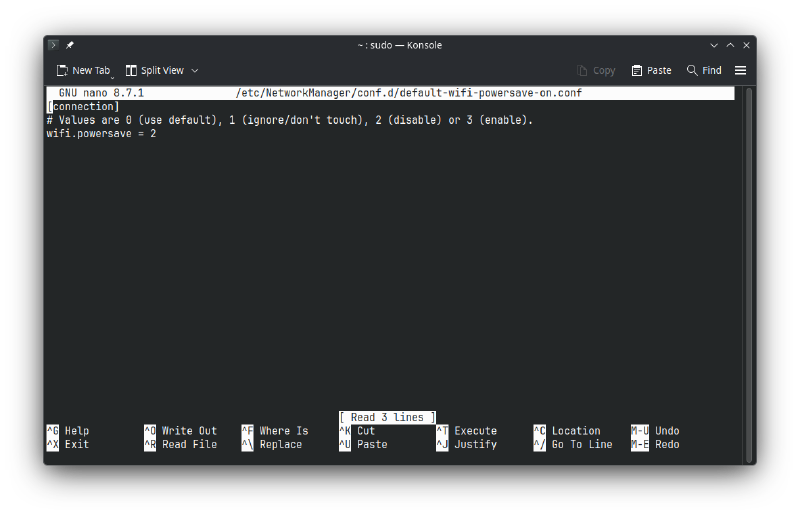
[connection]
wifi.powersave = 3
The number 3 means power saving is enabled.
Change that 3 to a 2, which means power saving is disabled.
[connection]
wifi.powersave = 2
Wait, why 2 and not 0? > In NetworkManager terminology:
0= Use default value1= Don’t touch existing settings2= Disable power saving3= Enable power saving
Step 4: Save and exit
If you are using nano, press Ctrl+O (then Enter) to save, and Ctrl+X to exit.
Step 5: Restart NetworkManager To apply the changes immediately without rebooting your PC, restart the NetworkManager service:
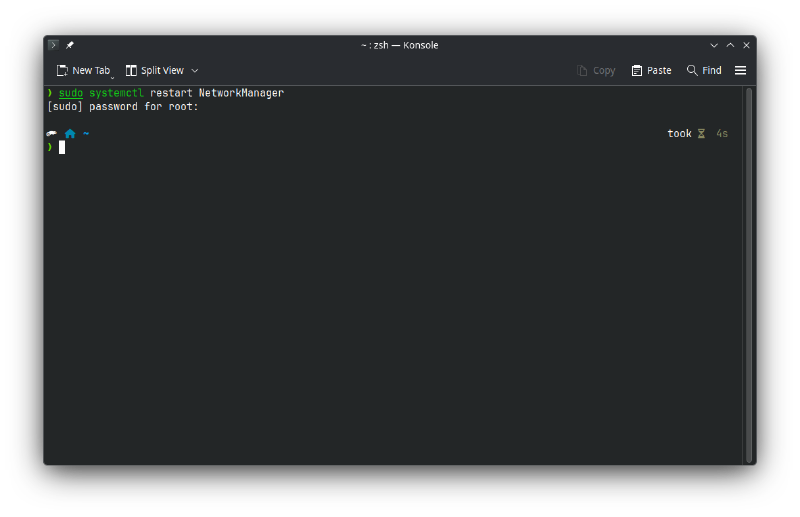
sudo systemctl restart NetworkManagerYour Wi-Fi will disconnect and reconnect over the next few seconds.
Verifying the Fix#
If you want to be absolutely sure the setting took effect, you can use the iwconfig tool (you may need to install the wireless-tools package if you don’t have it).
Run this command in your terminal:
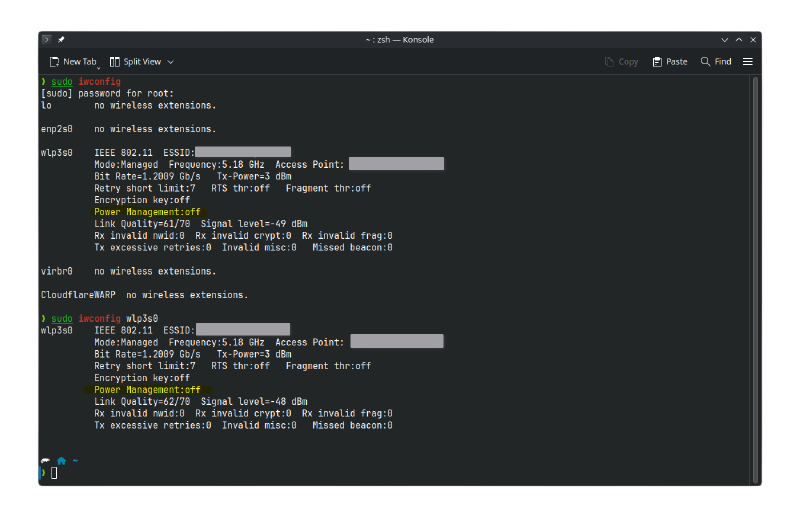
sudo iwconfigLook for your wireless interface (usually named something like wlan0 or wlp3s0). In the output block for that interface, look for the Power Management line. It should now proudly read:
Power Management:off
Boot up your favorite game and test it out. Your latency should now be significantly smoother and more consistent.
While an Ethernet cable will always be the gold standard for gaming, disabling Wi-Fi power management is the easiest way to make wireless Linux gaming a viable, frustration-free experience.